What You Need to Know About Frontend Build
Webpack Loader
Webpack’s loaders are used to transform the source code of modules. During the build process, Webpack uses loaders to process different types of files, such as converting TypeScript to JavaScript, SCSS to CSS, or compiling source code in a specific format into target code.
Webpack-Chain and Chunk Splitting Explained
Webpack-Chain is a chainable API tool for more elegantly manipulating Webpack configurations. Compared to directly modifying the Webpack configuration object, Webpack-Chain provides a more intuitive and readable approach. Why is it more intuitive and readable? Because the previous method might have been imperative, whereas now it is declarative, allowing operations on different configurations by specifying a name. Detailed Documentation
exclude
To exclude a certain file.
config.module
  .rule('exclude')
  .exclude
  .add(/\.svg$/) // Exclude svg, as svg is handled by a separate loader
  .end()
config.target('node')
config.target('node') is used to specify that the final compiled output will run in a Node.js environment. This is very useful when developing server-side rendering (SSR) or build tools.
Sample Code
const Config = require('webpack-chain');
const config = new Config();
// Specify the target environment as Node.js
config.target('node');
// Output the configuration
console.log(config.toString());
Use Cases
- Building SSR applications.
- Developing CLI tools or Node.js scripts.
- Using Webpack-bundled code in a server-side environment.
Webpack Chunk Splitting Mechanism
Webpack’s chunk splitting mechanism is one of its core features, effectively optimizing resource loading and performance.
What is a Chunk?
A Chunk is an internal concept in Webpack, representing a collection of modules. Ultimately, these Chunks are bundled into one or more files (like .js files). With a reasonable splitting strategy, initial load time can be reduced, improving user experience.
Chunk Generation Rules
Webpack generates Chunks based on the following rules:
- Entry Files: Each entry file generates an initial Chunk.
- Dynamic Imports: Modules imported dynamically via
import()will generate a new Chunk. - SplitChunksPlugin: By configuring
optimization.splitChunks, common dependencies can be extracted into a separate Chunk.
Sample Code
module.exports = {
  entry: {
    main: './src/index.js',
    vendor: './src/vendor.js',
  },
  output: {
    filename: '[name].[contenthash].js',
    path: __dirname + '/dist',
  },
};
The above configuration will generate two initial Chunks: main and vendor.
The Role of SplitChunksPlugin
SplitChunksPlugin is a built-in Webpack plugin for optimizing splitting strategies. It helps extract common dependencies to avoid redundant bundling.
Common Configuration
module.exports = {
  optimization: {
    splitChunks: {
      chunks: 'all', // Split chunks for both sync and async code
      minSize: 20000, // Minimum size for a chunk to be generated
      maxSize: 50000, // Maximum size for a chunk to be generated
      minChunks: 1, // Minimum number of chunks that must share a module before splitting
      cacheGroups: {
        vendors: {
          test: /[\\/]node_modules[\\/]/, // Extract third-party libraries
          priority: -10,
          name: 'vendors',
        },
        default: {
          minChunks: 2, // Must be shared by at least two modules
          priority: -20,
          reuseExistingChunk: true, // Reuse existing chunk if possible
        },
      },
    },
  },
};
Configuration Analysis
chunks: 'all': Splits chunks for both synchronous and asynchronous code.minSizeandmaxSize: Control the size range of the generated chunks.cacheGroups: Defines grouping rules, for example, extracting third-party libraries or common modules.
Dynamic Imports and Splitting
Dynamic imports (import()) are the core mechanism for Webpack’s on-demand loading. Each call to import() generates a new Chunk.
Sample Code
// index.js
import('./dynamicModule').then(module => {
  module.default();
});
The code above will generate a new Chunk named dynamicModule.[contenthash].js.
Advantages of Dynamic Imports
- On-demand loading: The corresponding module is loaded only when needed.
- Reduced initial load time: The main bundle is smaller and loads faster.
Webpack Externals
Introduction to Externals
Webpack’s externals configuration allows certain modules to be excluded from the bundle and loaded via external scripts (like from a CDN). This approach can significantly reduce bundle size and support on-demand loading of external dependencies.
Applicable Scenarios:
- When using third-party libraries, to avoid bundling them into the final file.
- To dynamically load external resources to optimize initial page load speed.
Externals Configuration Example
Configuration Method
Here is a typical externals configuration example:
module.exports = {
  // ...
  externalsType: 'script', // Declares the loading method for external resources as <script>
  externals: {
    lodash: [
      'https://cdn.jsdelivr.net/npm/[email protected]/lodash.min.js', // External script URL
      '_', // Global variable name
    ],
  },
};
Parameter Description:
externalsType: Specifies the loading type for external resources. Here,'script'is used to indicate loading via a<script>tag.externals:- The first parameter is the URL of the external script.
- The second parameter is the global variable name (e.g.,
_) used to reference the library in the code.
Side Effects
When a package is declared as externals, Webpack rewrites its dynamic loading logic to be asynchronous. For example:
import _ from 'lodash';
Will be rewritten as:
import('./lodash.js').then(res => {
  const _ = res.default || res;
  // Use lodash
});
Additional Notes:
- This method ensures that external dependencies are loaded only when needed, avoiding blocking of the initial page render.
- It’s important to note that dynamic loading may increase the latency of the first use, so the performance impact needs to be weighed.
How to Determine if a Package is Externalized
In a UMD-formatted bundle file, you can determine if a package has been externalized by the following characteristics:
- Check for Global Variables:
If you find code similar to the following in the UMD file header:It indicates that the package has been externalized.
root['packageName'] - Example Analysis:
Suppose we have externalized
lodash. The bundled code might contain a snippet like this:(function(root, factory) { if (typeof define === 'function' && define.amd) { define([], factory); } else if (typeof exports === 'object') { module.exports = factory(); } else { root['_'] = factory(); // Mounts lodash to the global variable _ } })(this, function() { return _; // References the externally loaded lodash });
Additional Notes:
- The global variable name (e.g.,
_) can be used to quickly locate how the external dependency is loaded.- During debugging, you can check if the global object (e.g.,
window._) exists in the browser console to verify that the external dependency has loaded correctly.
Don’t Use external for Your Own Libraries
- There are dependency relationships that require maintaining order.
- Be aware if the CDN acceleration is still active.
- A global
externalsconfiguration could cause failures if a page forgets to include the script; the same applies to deletion. - For package size and build speed, these can be handled by package build tools.
Module Federation
Module Federation is a powerful feature introduced in Webpack 5, designed to solve module sharing and independent deployment issues in micro-frontend architectures. With Module Federation, each module can be developed and deployed independently, while still being able to work together to build a complete application.
Core Concepts
Independent Development and Independent Deployment
- Independent Development: Each module can be developed as a separate project, with its own codebase, dependencies, and build process.
- Independent Deployment: Modules have no strong dependencies on each other and can be deployed to the production environment individually without affecting other modules.
Building Together
- Although modules are developed and deployed independently, they can dynamically load and share dependencies at runtime through the module federation mechanism, thus achieving collaborative work.
- This approach allows multiple teams to develop different modules in parallel without frequent code or dependency synchronization.
Advantages of Module Federation
- Decoupling Modules
- There are no direct dependency relationships between modules, reducing coupling.
- Each module can be upgraded and maintained independently, improving development efficiency.
- Dynamic Loading
- Modules can be loaded on-demand at runtime, reducing initial load time.
- Suitable for micro-frontend architectures of large applications, enhancing performance and user experience.
- Shared Dependencies
- Different modules can share common dependencies (like React, Lodash, etc.), avoiding redundant loading of the same libraries.
- Supports version control to ensure compatibility of shared dependencies.
- Flexible Team Collaboration
- Different teams can focus on their respective module development without worrying about code conflicts with other teams.
- Suitable for large projects with multi-team collaboration.
Use Cases
Micro-frontend Architecture
- Module Federation is very suitable for micro-frontend architectures, allowing a large application to be split into multiple smaller modules.
- Each module can be managed by a different team, developed, tested, and deployed independently.
Dynamic Plugin System
- Can be used to build a dynamic plugin system where the main application loads different plugin modules at runtime.
- Plugin modules can be developed and deployed independently, and the main application does not need to be rebuilt.
Multi-version Support
- Supports different modules using different versions of dependency libraries, avoiding version conflict issues.
Example: Basic Configuration of Module Federation
The following is a simple example of a Module Federation configuration, demonstrating how to achieve independent development and building together.
Host Application
// webpack.config.js
const { ModuleFederationPlugin } = require("webpack").container;
module.exports = {
  plugins: [
    new ModuleFederationPlugin({
      name: "host",
      remotes: {
        remoteApp: "remote@http://localhost:3001/remoteEntry.js",
      },
      shared: ["react", "react-dom"],
    }),
  ],
};
Remote Module
// webpack.config.js
const { ModuleFederationPlugin } = require("webpack").container;
module.exports = {
  plugins: [
    new ModuleFederationPlugin({
      name: "remote",
      filename: "remoteEntry.js",
      exposes: {
        "./Component": "./src/Component",
      },
      shared: ["react", "react-dom"],
    }),
  ],
};
How it Works
- The host application dynamically loads the remote module through the
remotesconfiguration. - The remote module exposes its components or functions through the
exposesconfiguration. - Shared dependencies (like React) are shared between the host application and the remote module, avoiding redundant loading.
Tree Shaking
usedExports
usedExports is a Webpack configuration option used to mark unused code. It is the foundation of Tree-shaking and only applies to the ES module specification (ESM). It was originally introduced by Rollup.
optimization: {
  usedExports: true, // Marks which code is not used
},
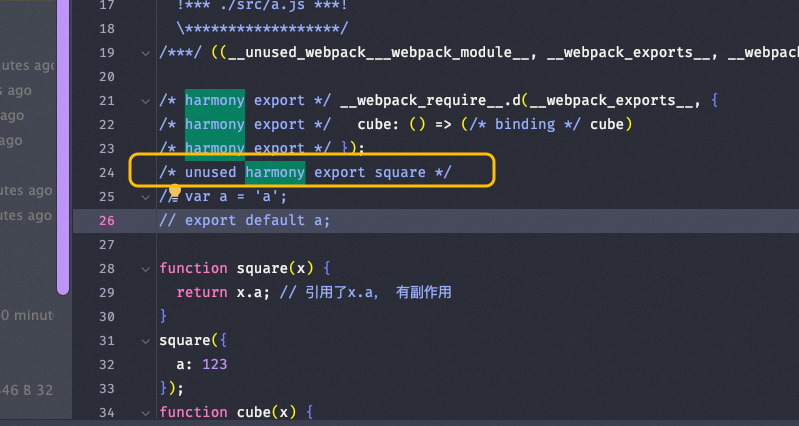
/*#__PURE__*/ Comment
/*#__PURE__*/ is an explicit declaration used to tell tools that certain function calls have no side effects. In some scenarios, such as variable assignment, side effects might occur.
What are side effects?
- A function’s arguments are modified.
- Calling a function with side effects: e.g., making a request, printing to the console, reading/writing files.
- Database modifications or network state changes.
- Throwing an exception.
- Modifying global variables, static variables, or class member variables.
Sample Code
// maths.js
export function square(x) {
	return x.a; // References x.a, has a side effect
}
/*#__PURE__*/square({ a: 123 });
export function cube(x) {
	return x * x * x;
}
// main.js
import { cube } from './maths.js';
console.log(cube(5));
TerserWebpackPlugin
TerserWebpackPlugin
is a plugin for compressing and analyzing dead code. It works in conjunction with usedExports to remove unused code.
UglifyJsWebpackPlugin
UglifyJsWebpackPlugin is another code compression plugin, but it wraps code in an immediately-invoked function expression (IIFE), which might reference external variables, causing Tree-shaking to fail.
Recommendations for Developing JS Libraries
- Use Rollup for bundling, as it supports ES6 module exports and program flow analysis (to determine which code has side effects).
- Try to package components into separate directories for easy referencing by others.
- Alternatively, develop a plugin to implement on-demand loading.
mainFields Configuration
mainFields is used to control the priority of resolving entry files.
{
	resolve: {
		mainFields: ['browser', 'module', 'main'], // You can adjust the priority of the fields
	},
}
Plugin Recommendation
NormalModuleReplacementPlugin: Replaces resources.
Webpack Support for mjs Files
To make Webpack support .mjs files, you can use the following configuration:
- Ensure your Webpack version is 4 or higher.
- Add
.mjstoresolve.extensions. - Set
type: "module".
Build Types and Module Systems
Webpack supports multiple module systems, collectively known as UMD (Universal Module Definition):
- var/window: Global variable method.
- AMD/CommonJS/CommonJS2/root: Different module standards.
- The difference between CommonJS2 and CommonJS lies in
module.exportsversusexports.
- The difference between CommonJS2 and CommonJS lies in
Tree-shaking Explained
Tree-shaking is an optimization technique that removes unused code through static analysis. It is enabled by default in production environments, but in some cases, additional configuration is needed to achieve the best results.
Static Structure
The import and export syntax of ES6 modules is determined before the code is loaded. All imported and exported module dependencies can be fully identified during the code parsing phase. This is different from the CommonJS module system, which can contain dynamic dependencies (for example, require can be called inside a function).
Unconditional Execution
In ES6 modules, import and export statements must be at the top-level scope of the module. Therefore, imported modules are resolved during module initialization, not during code execution. This means the loading order and dependency relationships of modules are fixed.
Side-effect-free Imports
By default, ES6 modules do not allow dynamic importing of modules based on runtime conditions. This limitation eliminates many complex scenarios, making it easier for tools to perform code analysis.
sideEffects Configuration
sideEffects is a field in package.json used to declare whether a module has side effects.
- If set to
false, it indicates that the module has no side effects, and Webpack will more aggressively remove unused code. - If not configured or configured improperly, it may affect the effectiveness of Tree-shaking.
Example
{
  "sideEffects": false
}
Notes
- In SSR scenarios, a dynamically constructed environment cannot be configured with
sideEffects: false, as this could lead to the loss of some code.
output Configuration
output is used to specify the output directory and filename.
output: {
  path: __dirname + '/dist',
  filename: 'bundle.js',
},
Common Errors
Error Message
ERR! The 'compilation' argument must be an instance of Compilation 348 TypeError: The 'compilation' argument must be an instance of Compilation
Solution
- Incompatible Webpack version, it is recommended to downgrade to Webpack 4.
Rollup
Rollup is a module bundler that focuses on bundling ES modules (ESM). It can efficiently merge multiple modules into one or more files and supports multiple output formats (such as ESM, CommonJS, UMD, etc.). Rollup’s configuration file is typically a JavaScript file used to define the bundling behavior. Simple conclusion: Rollup is suitable for bundling library files.
Configuration File Analysis
The following is a detailed analysis of the various parts of a Rollup configuration file.
Entry File
input: 'src/index.js', // Entry file
- Purpose: Specifies the path to the entry file for bundling.
- Explanation:
inputis one of Rollup’s core configuration options, telling Rollup which file to start analyzing dependencies from.- The entry file in the example is
src/index.js, which is the main file of the project.
Output Configuration
output: {
  file: 'dist/bundle.js',    // Output file
  format: 'esm',             // Output format: ES module
},
- Purpose: Defines the output file and its format after bundling.
- Key Fields:
file: Specifies the path and name of the output file.format: Specifies the module format of the output file.- Common formats include:
esm: ES module format (recommended for modern browsers and Node.js).cjs: CommonJS format (suitable for Node.js).umd: Universal Module Definition format (compatible with browsers and Node.js).
- Common formats include:
- In the example, the output file is
dist/bundle.js, and the format isesm.
Plugins
plugins: [
  resolve(),                 // Use the node-resolve plugin
],
- Purpose: Extends Rollup’s functionality through plugins.
- Common Plugins:
@rollup/plugin-node-resolve: Resolves third-party modules (e.g., dependencies innode_modules).@rollup/plugin-commonjs: Converts CommonJS modules to ES modules.@rollup/plugin-babel: Transpiles code using Babel.rollup-plugin-terser: Minifies the output file.
- Explanation:
- The example uses the
resolve()plugin to resolve external dependency modules.
- The example uses the
Complete Configuration Example
Here is the complete code for a Rollup configuration file:
import resolve from '@rollup/plugin-node-resolve';
export default {
  input: 'src/index.js',       // Entry file
  output: {
    file: 'dist/bundle.js',    // Output file
    format: 'esm',             // Output format: ES module
  },
  plugins: [
    resolve(),                 // Use the node-resolve plugin
  ],
};
Vite
Vite is a modern frontend build tool that typically requires server-side support (such as modifying template files, injecting scripts, etc.) to run properly. However, in some scenarios (like regular page development), we cannot directly modify the server-side code. In such cases, we can use a Whistle proxy to dynamically modify HTML files and inject the scripts required by Vite, thus indirectly enabling Vite development.
Whistle Proxy Rule Configuration
HTML Replacement Rule
Using Whistle’s resReplace feature, you can dynamically modify the content of HTML files to inject the scripts needed by Vite.
Whistle Rule Example
/(pre-)?(c|g)sp.a.com\/apps\/.*$/ resReplace://{res-replace}
The rule above matches HTML files under the specified domain and replaces their content using resReplace.
Script Injection Content
The following is the script content that needs to be injected into the HTML file:
/xxx/: <script type="module">import RefreshRuntime from "http://localhost:5173/@react-refresh";RefreshRuntime.injectIntoGlobalHook(window);window.$RefreshReg$ = () => {};window.$RefreshSig$ = () => (type) => type;window.__vite_plugin_react_preamble_installed__ = true;</script><script type="module" src="http://localhost:5173/@vite/client"></script><script type='module' src='http://localhost:5173/src/index.ts'></script><script type='module' src='http://localhost:5173/src/app.tsx'></script>
Injection Content Analysis
- React Refresh Plugin:
@react-refreshand related global variables (like$RefreshReg$,$RefreshSig$) are used to support React Hot Module Replacement.
- Vite Client Script:
http://localhost:5173/@vite/clientis the client-side script provided by Vite to support hot updates and module loading.
- Entry Files:
index.tsandapp.tsxare the project’s entry files; the specific paths should be adjusted according to the project structure.
Vite Configuration Explained
The following is the complete configuration of vite.config.js with key points explained.
Configuration Code
import path from 'path';
import react from '@vitejs/plugin-react';

/** @type {import('vite').UserConfig} */
export default {
  plugins: [react()],
  resolve: {
    dedupe: ['react', 'react-dom'],
    alias: [
      { find: '@alife/zoro-cookie', replacement: '@alife/zoro-cookie/lib/index.js' },
      {
        find: '~@alife/theme-csp-seller/index.scss',
        replacement: path.resolve(__dirname, './src/empty.scss'),
      },
      {
        find: '@alife/next',
        replacement: '@alifd/next',
      },
      {
        // @2
        find: /^~(.+)/,
        replacement: '$1',
      },
    ],
  },
  css: {
    preprocessorOptions: {
      scss: {
        includePaths: ['node_modules'],
      },
    },
  },
  server: {
    // @3
    cors: {
      origin: ['https://pre-csp.a.com', 'https://*.a.com'],
      credentials: true,
    },
    headers: {
      'Access-Control-Allow-Origin': '*',
      'Access-Control-Allow-Methods': 'GET,HEAD,PUT,PATCH,POST,DELETE',
      'Access-Control-Allow-Headers': 'Origin, X-Requested-With, Content-Type, Accept',
    },
  },
};
@2: Solving Sass Style Import Issues
When using Sass, you might encounter the following error:
[plugin:vite:css] [sass] Can't find stylesheet to import.
╷
1 │ @import '~@alifd/next/variables';
│ ^^^^^^^^^^^^^^^^^^^^^^^^
╵
Solution
Configure resolve.alias to replace the ~ prefix with the actual path:
{ find: /^~(.+)/, replacement: '$1' }
@3: Solving Cross-Origin Issues
In a development environment, the browser might block script loading due to cross-origin issues, for example:
Access to script at 'http://localhost:5173/@vite/client' from origin 'xx' has been blocked by CORS policy
Solution
Configure server.cors and server.headers to allow cross-origin access:
cors: {
  origin: ['https://pre-csp.a.com', 'https://*.a.com'],
  credentials: true,
},
headers: {
  'Access-Control-Allow-Origin': '*',
  'Access-Control-Allow-Methods': 'GET,HEAD,PUT,PATCH,POST,DELETE',
  'Access-Control-Allow-Headers': 'Origin, X-Requested-With, Content-Type, Accept',
},
Summary
- Whistle proxy is a solution to enable Vite development without modifying server-side code.
- By dynamically modifying HTML files and injecting the necessary scripts for Vite, a development environment can be quickly set up.
- In the Vite configuration, proper use of
resolve.aliasandserver.corscan solve common style import and cross-origin issues. - This solution is suitable for scenarios where server-side code cannot be directly modified, but attention should be paid to security and performance optimization in the production environment.
Error Cases
When using the graceful-fs module, you may encounter the following errors:
Error Description
Error 1
error in ../dida-chc-app/node_modules/graceful-fs/graceful-fs.js
Module not found: Error: Can't resolve 'fs' in '/Users/maoxunxing/arise/dida-chc-app/node_modules/graceful-fs'
Error 2
error in ../dida-chc-app/node_modules/graceful-fs/legacy-streams.js
Module not found: Error: Can't resolve 'stream' in '/Users/maoxunxing/arise/dida-chc-app/node_modules/graceful-fs'
Error Hint
BREAKING CHANGE: webpack < 5 used to include polyfills for node.js core modules by default.
This is no longer the case. Verify if you need this module and configure a polyfill for it.
Problem Cause
Based on the error hint and common scenarios, the following are possible causes:
- Missing Node.js Core Modules:
graceful-fsis a library that depends on Node.js core modules (likefsandstream).- Webpack 5 no longer provides polyfills for Node.js core modules by default, so using these modules in a browser environment will cause an error.
- Mixing Node and Browser Packages:
- Some libraries (like
graceful-fs) are designed specifically for the Node.js environment but are incorrectly imported into a frontend project. - This usually happens when some modules in the dependency tree do not correctly distinguish between environments (Node.js or browser).
- Some libraries (like
- Webpack Configuration Issue:
- If the project uses a build tool like Webpack and is not correctly configured with polyfills or has not excluded modules unsuitable for the browser, it can also lead to such errors.
Solutions
Method 1: Check Dependencies and Remove Unnecessary Modules
- Steps:
- Check the project’s
package.jsonfile to confirm ifgraceful-fsis directly or indirectly imported. - If the module is only used in a Node.js environment and your project is a browser application, you need to remove the related dependency.
- Use the following command to view the dependency tree and locate the module that imports
graceful-fs:npm ls graceful-fs - If you find that some dependencies have incorrectly imported
graceful-fs, you can try upgrading or replacing them.
- Check the project’s
Method 2: Add Polyfills to Webpack
- Steps:
- Install the necessary polyfill packages:
npm install --save-dev stream-browserify fs - Modify the Webpack configuration file (
webpack.config.js) to add the following content:const webpack = require('webpack'); module.exports = { resolve: { fallback: { fs: false, // Ignore the fs module stream: require.resolve('stream-browserify'), // Use a polyfill instead }, }, plugins: [ new webpack.ProvidePlugin({ process: 'process/browser', // Provide the process object }), ], };
- Install the necessary polyfill packages:
Method 3: Use the browser Field to Exclude Node.js Modules
- Steps:
- Add a
browserfield to your project’spackage.jsonto explicitly exclude modules not suitable for the browser:{ "browser": { "fs": false, "stream": false } } - This tells the bundler to ignore these modules, preventing errors.
- Add a
Method 4: Upgrade Dependency Versions
- Steps:
- Check if the version of
graceful-fsis too old. If so, upgrade to the latest version:npm install graceful-fs@latest - Also, ensure that other dependencies are up-to-date to reduce compatibility issues.
- Check if the version of
Additional Information
Why does this problem occur?
- Historical Context:
- In Webpack 4 and earlier versions, polyfills for Node.js core modules were provided by default, so using these modules in a browser environment did not cause errors.
- Webpack 5 removed this default behavior to reduce unnecessary bundle bloat and encourage developers to explicitly handle environment differences.
- Best Practices:
- During development, you should try to avoid importing Node.js-specific modules into browser projects.
- If you really need to use these modules, you can resolve the issue with polyfills or alternative solutions.
npm i webpack-cli error:
npm ERR! Cannot read properties of null (reading 'package')
npm ERR! A complete log of this run can be found in:
npm ERR!     /Users/felix/.npm/_logs/2025-03-25T03_51_31_544Z-debug-0.log
Problem cause: node version is too low
require package not found, fixed by specifying js extension in resolve
bootstrap:27 Uncaught Error: Cannot find module 'core-js-pure/features/global-this'
    at webpackMissingModule (ReactRefreshEntry.js:3:1)
    at ../../node_modules/@ice/bundles/compiled/@pmmmwh/react-refresh-webpack-plugin/client/ReactRefreshEntry.js (ReactRefreshEntry.js:3:1)
    at options.factory (react refresh:6:1)
    at __webpack_require__ (bootstrap:24:1)
    at startup:4:1
    at __webpack_require__.O (chunk loaded:23:1)
    at startup:8:1
    at startup:8:1
    at webpackUniversalModuleDefinition (universalModuleDefinition:9:1)
    at universalModuleDefinition:10:1
References
- Webpack Official Documentation — Official Webpack concepts and configuration guide
- Vite Documentation — Official Vite documentation and migration guide
- Module Federation Documentation — Official Module Federation plugin documentation and examples
New articles on AI agents, full-stack engineering, and a one-person company
I email new writing about AI and agents, full-stack engineering, and building a one-person company. No spam, and you can unsubscribe anytime.