Automated Application Deployment and Publishing
Foreword
This article summarizes some common problems and solutions encountered when using the PM2 tool, helping developers quickly get started with PM2’s automatic deployment feature.
Preparation
Experimental Environment
- Virtual Machine: VMware virtual machine with Ubuntu 16.04 installed.
- Local Environment: Windows 7 platform with Xshell installed.
Steps
1. Install VMware and Configure the Window
- Install Ubuntu 16.04 on VMware (tutorials can be found online).
- After installation, adjust the virtual machine window size for easier operation:
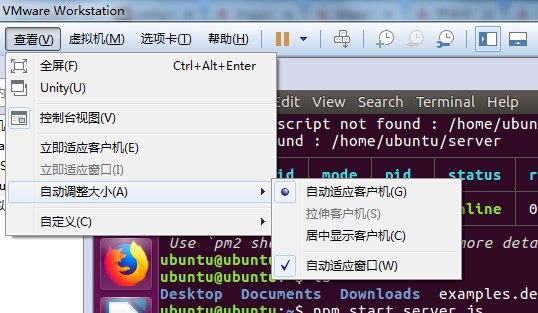
2. Install Xshell
- Install Xshell on the local Windows 7 system to remotely connect to the virtual machine.
Getting Started
Virtual Machine Environment Configuration
1. Upgrade Packages
sudo apt-get update
2. Install Essential Tools
sudo apt-get install git vim openssl openssh-server build-essential libssh-dev wget curl
- openssh-server: Used to connect to the virtual machine via SSH.
- curl: A transfer tool under Linux.
- git: Used to manage Node.js source code versions.
3. Install NVM
curl -o- https://raw.githubusercontent.com/creationix/nvm/v0.33.8/install.sh | bash
4. Install Node.js
nvm install v8.1.2
nvm use v8.1.2
5. Disable the Firewall
To ensure you can connect to the virtual machine via SSH later, it is recommended to disable the firewall:
sudo ufw stop
6. Install Yarn, Vue CLI, and PM2
curl -sS https://dl.yarnpkg.com/debian/pubkey.gpg | sudo apt-key add -
echo "deb https://dl.yarnpkg.com/debian/ stable main" | sudo tee /etc/apt/sources.list.d/yarn.list
sudo apt-get update && sudo apt-get install yarn
npm install vue-cli pm2 -g
- Yarn: A package management tool, similar to npm.
- Vue CLI: Vue’s command-line tool.
- PM2: A service management tool for Node.js.
Testing the Node.js Environment on the Virtual Machine
- Create a
server.jsfile:Paste the following code into the file:vi server.js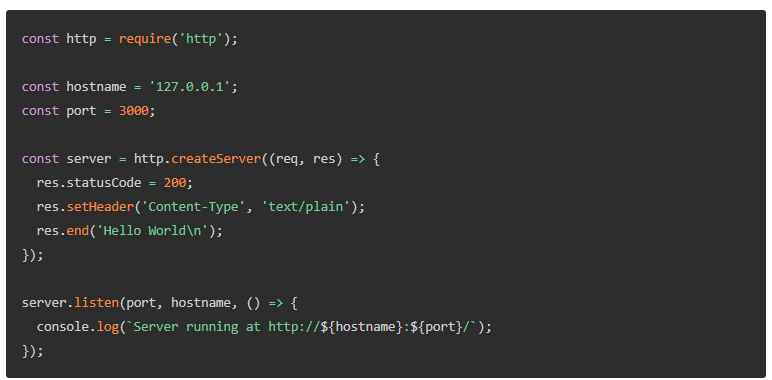
- Save and exit:
:wq! - Use PM2 to start the service:If you see the following status, the startup was successful:
pm2 start server.js
Connecting to the Virtual Machine from Local Windows
1. Modify SSH Configuration
Edit the /etc/ssh/sshd_config file:
vim /etc/ssh/sshd_config
Find the following content:
Authentication:
LoginGraceTime 120
PermitRootLogin prohibit-password
StrictModes yes
Change it to:
Authentication:
LoginGraceTime 120
PermitRootLogin yes
StrictModes yes
2. Start the SSH Service
sudo service ssh start
3. Check the Virtual Machine’s IP Address
ifconfig
Note down the virtual machine’s IP address:
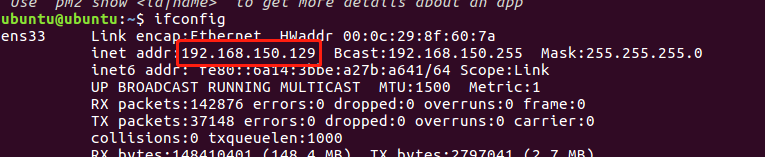
4. Connect Using Xshell
Enter the following command in Xshell:
- Username:
ubuntu. - IP Address: The virtual machine’s IP address.
- Network Mode: NAT mode is sufficient; no need to change to bridged mode. If the configuration is correct, you should be able to connect successfully.
Creating a Private Repository
1. Create a Bitbucket Repository
Create a repository named push2Server on Bitbucket:

2. Clone the Repository
Clone the repository to your local machine and create the following files:
server.js: Same code as used for testing earlier.ecosystem.json: PM2 automatic deployment configuration file. The directory structure is as follows: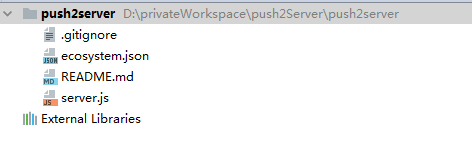
3. Configure ecosystem.json
{
  "apps": [
    {
      "name": "Test",
      "script": "server.js",
      "env": {
        "COMMON_VARIABLE": "true"
      },
      "env_production": {
        "NODE_ENV": "production"
      }
    }
  ],
  "deploy": {
    "production": {
      "user": "ubuntu", // Point 1: The username must be the virtual machine's username
      "host": "192.168.150.129", // Point 2: The IP address must be correct
      "port": "22", // Point 3: The port number must be correct
      "ref": "origin/master",
      "repo": "[email protected]:YellMan/push2server.git", // Point 4: Must start with git@, not HTTPS
      "path": "/home/ubuntu/www/testproject/production", // Point 5: The path must be an absolute path
      "ssh_options": "StrictHostKeyChecking=no",
      "env": {
        "NODE_ENV": "production"
      }
    }
  }
}
4. Configure Git SSH Key
Generate an SSH Key on the virtual machine and add it to Bitbucket:
ssh-keygen
cat ~/.ssh/id_rsa.pub
pbcopy < ~/.ssh/id_rsa.pub
Paste the public key into Bitbucket’s SSH Key settings page:
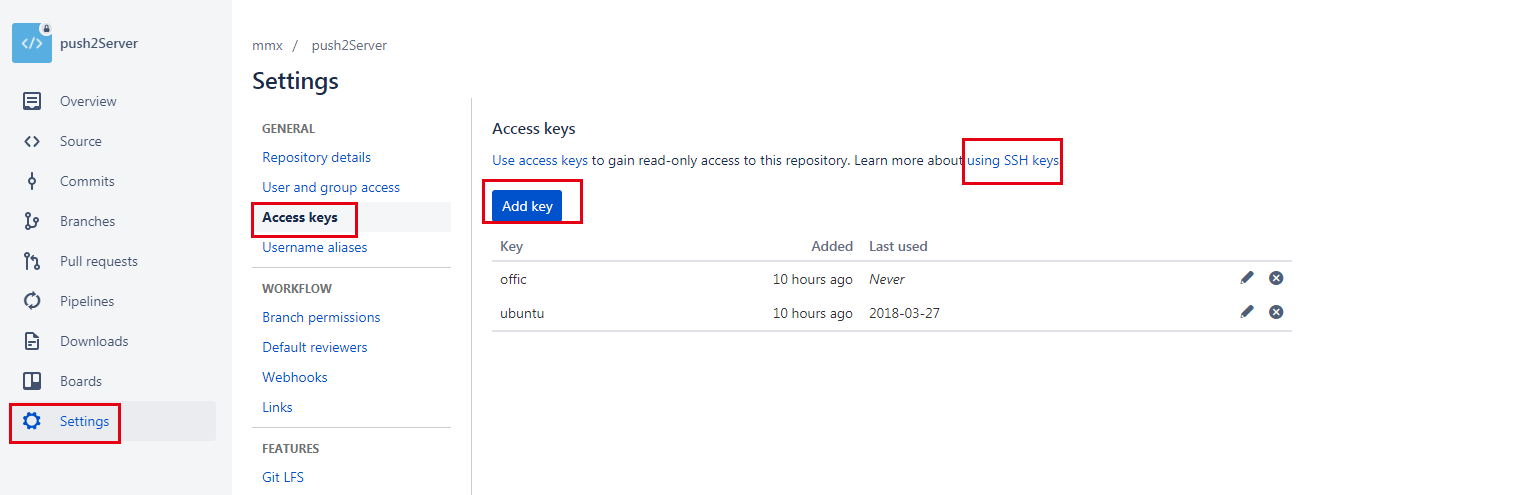 Verify if the SSH configuration is successful:
ssh -T [email protected]
5. Set Directory Permissions
Create the target directory on the virtual machine and grant permissions:
mkdir -p /home/ubuntu/www/testproject/production
sudo chmod 777 /home/ubuntu/www
sudo chmod 777 /home/ubuntu/www/testproject
Pre-Deployment Configuration
1. Initialize Deployment
Run the following command locally:
pm2 deploy ecosystem.json production setup
Common Problems and Solutions
- Error: Cannot find PM2 or Node
- Check the paths for PM2 and Node:
whereis pm2 whereis node - Create symbolic links:
sudo ln -s /opt/nodejs/bin/pm2 /usr/bin/pm2
sudo ln -s /home/ubuntu/.nvm/versions/node/v8.1.2/bin/node /usr/bin/node
- Check the paths for PM2 and Node:
- Error: SSH Key configuration failed
- Ensure the virtual machine’s SSH Key has been correctly added to Bitbucket.
- Other Errors
- Troubleshoot step-by-step based on the error message, for example, by checking paths, permissions, etc.
Publishing the Project
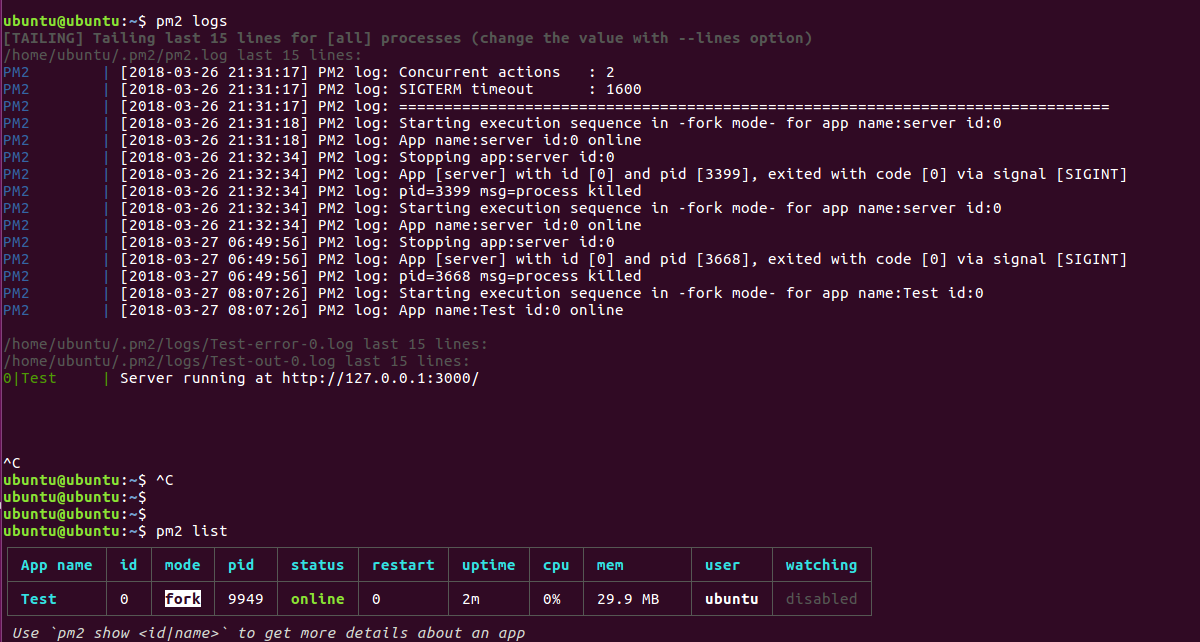
Execute the following command to complete the project deployment:
pm2 deploy ecosystem.json production
Check on the virtual machine to see if the automatic deployment was successful:
Summary
Through the steps above, we have completed the automatic deployment configuration for PM2. Here is a summary of the key points:
- Virtual Machine Environment Configuration: Including the installation of basic tools like Node.js, PM2, and SSH.
- Private Repository Configuration: Ensuring the
ecosystem.jsonfile is configured correctly. - Permission Management: Ensuring the target directories and files have the correct permissions.
- Troubleshooting Common Issues: Provided solutions for common errors. Hope this article helps you quickly master the use of PM2
References
- PM2 Documentation — Official PM2 process manager documentation
- Node.js Deployment Best Practices — Rising Stack — Guide to deploying Node.js applications in production
- GitHub Actions Documentation — Official documentation for CI/CD automation with GitHub Actions
New articles on AI agents, full-stack engineering, and a one-person company
I email new writing about AI and agents, full-stack engineering, and building a one-person company. No spam, and you can unsubscribe anytime.